
Ok, well to start this off I have been working with MDT and SCCM for years. I remember when computers started to include the ability to switch between UEFI and Legacy mode. If you want to know which you should use that would be for a different post as I am dealing with PXE booting them on this one.
First off to make this as simple as possible you want to have a DHCP server that supports what are called ‘Vendor Classes’. This is actually quite important as each client when asking for an IP will hand the server its class identifier. The two below are the important ones we are dealing with today.
UEFI x64
PXEClient:Arch:00007
Option 60: PXEClient
Option 66: IP of WDS server
Option 67: Boot\x64\wdsmgfw.efi
BIOS(Legacy) x86 and x64
PXEClient:Arch:00000
Option 60: PXEClient
Option 66: IP of WDS server
Option 67: Boot\x64\wdsnbp.com
Option 60 is only available if you are using the DHCP server as the deployment server and I honestly do not see it being necessary in my testing.
Option 66 is the host name if you have DNS working properly or the IP if you do not have internal DNS configured.
Option 67 is the boot file needed to PXE boot. While they are all important to get right this one is what the client uses to bootstrap the initial network boot.
I know that Microsoft DHCP Server and DHCPD for Linux/Unix servers supports it but currently Meraki does not. I have made a ‘wish’ with them so one can hope. I am discussing the Microsoft DHCP Server method today and discussing how to set up a DHCP server is beyond the scope of this post.
You start out by right clicking on the IPv4 tree in the DHCP server admin section and selecting ‘Define Vendor Classes’.
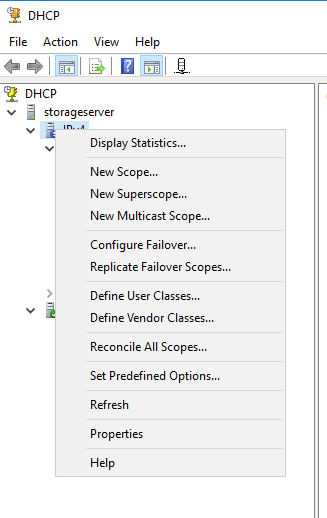
Do not worry about the three that are included with the server.
You would next need to click on Add.
The display name and description is for your own use but I will warn you once you save this class you cannot change the display name… annoying but true.
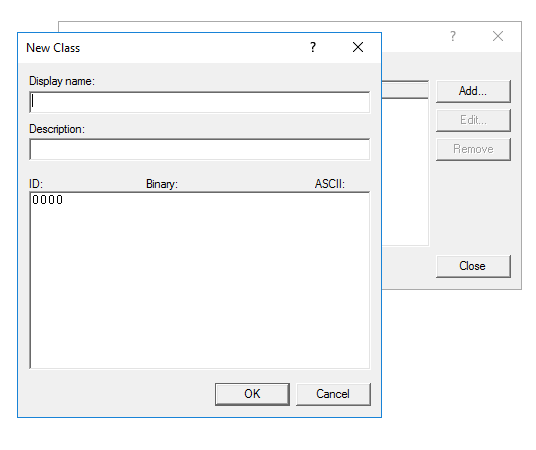
Click in the ASCII section and type in the one you want to create a policy for listed above.
IMPORTANT: It is case sensitive and will NOT work if you do this part wrong.

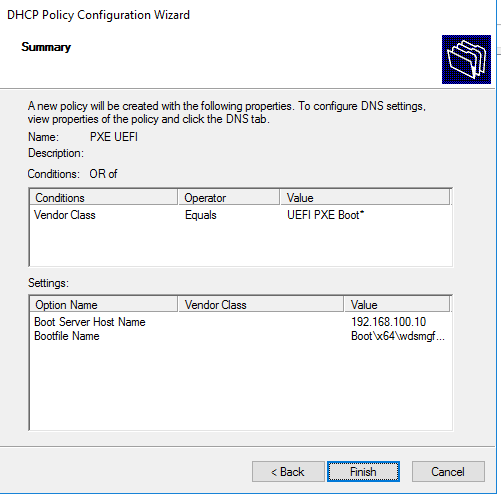
Once you have the classes you want to define close that window and then go to the scope you are wanting to get this configured for and we are going to add a policy.
Create a new policy and name it whatever you want.
Click on Next and then click on Add.
Change the value to the class you created and then check the ‘Append wildcard(*)’ and click Add so it appears in the box and then click ok.

Click on Next and I usually select No on the option for ‘IP address range’ but that is up to you.
On the ‘Configure settings for the policy’ part of this wizard you are to set the ‘scope options’ for this policy.
This is where you add the boot server(66) and the Bootfile(67) information
Click Next and then Finish.
It is actually that simple. I have tested it using Hyper-V virtual machines on my home lab.
Maybe later I will edit this post to include screenshots but for now this will work.
Edit 07/09/2018: Added some screenshots